为什么转用axios
由于vue的作者尤雨溪大大说了,vue2.0以后的版本已经不再维护vue-resource了,推荐大家使用axios;一番摸索之后,发现axios的使用和ajax极其相似但也有很多不同的地方,于是记下来方面以后回顾
对比ajax和axios的使用方法
在使用axios之前先回顾下如何用jquery的ajax来进行请求:
1
2
3
4
5
6
7
8
9
10
11
12
| $.ajax({
type: 'POST',
url: url,
data: data,
dataType: dataType,
success: function(res, status){
console.log(res);
},
error: function(err){
console.log(err);
}
})
|
在vue、react等MVVM等框架兴起之前,jquery基本是前端的必备工具,而jquery基于原生XHR的封装的ajax更成为了前后端交互的主要方式,而现在jquery明显有些过时了,下面展示下如何用axios进行数据请求
1
2
3
4
5
6
7
8
9
10
11
12
13
14
15
16
17
18
19
20
21
22
23
24
25
|
axios.get(url, {
params: {
ID: 12345
}
})
.then(function (response) {
console.log(response);
})
.catch(function (error) {
console.log(error);
});
axios.post(url, {
firstName: 'Fred',
lastName: 'Flintstone'
})
.then(function (response) {
console.log(response);
})
.catch(function (error) {
console.log(error);
});
|
vue项目里面使用axios使用
安装
使用
目前vue里面使用axios大抵是如下两种方式
1、和vue-resource使用类似
在main.js里面引入
1
2
3
4
5
6
7
8
| import axios from "axios";
Vue.prototype.$axios = axios;
this.$axios.get("/seller",{"id":123}).then(res=>{
console.log(res);
});
|
2、在需要的模块或者组件里面使用
1
2
3
4
5
6
7
8
9
10
11
12
| import axios from 'axios';
axios.post('/user', {
firstName: 'Fred',
lastName: 'Flintstone'
})
.then(function (response) {
console.log(response);
})
.catch(function (error) {
console.log(error);
});
|
如何利用axios来实现跨域
此处以获取QQ音乐的歌词为例,首先打开build文件夹下面的webpack.dev.conf.js
1
2
3
4
5
| var express = require('express')
var axios = require('axios')
var app = express();
var apiRoutes = express.Router();
app.use('/api', apiRoutes)
|
然后在devWebpackConfig里面的devServer这边写代码如下图:
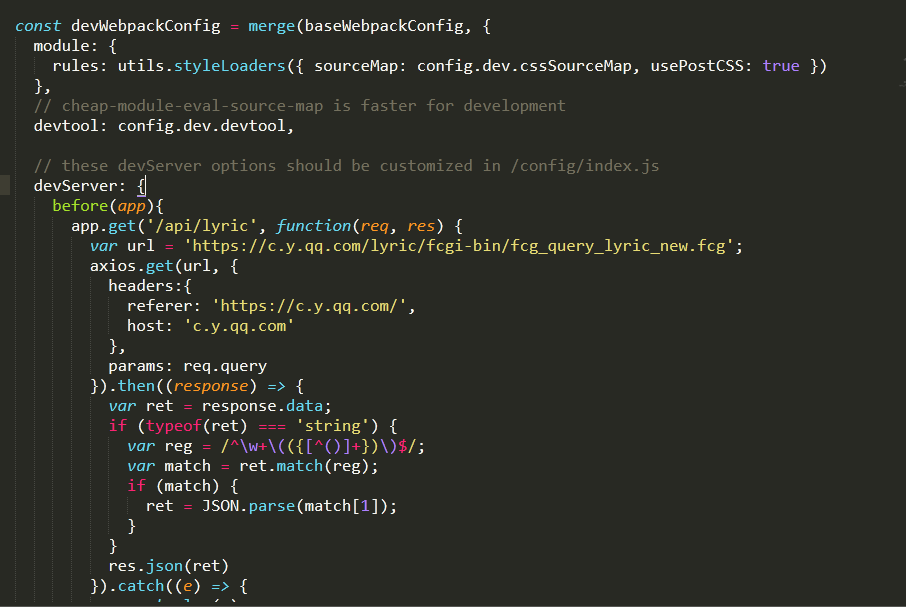
主要代码就是before里面的这段。
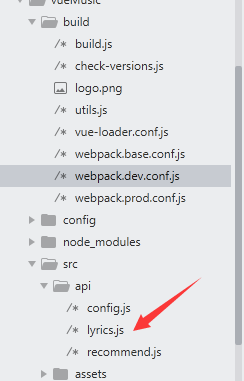
然后在src下面新建一个api文件夹
1
2
3
4
5
6
7
8
9
10
11
12
13
14
15
16
17
18
19
20
21
22
| import axios from 'axios';
export function getLyrics(mid) {
const url = '/api/lyric';
const param = {
g_tk: 1928093487,
inCharset: 'utf-8',
outCharset: 'utf-8',
notice: 0,
format: 'json',
songmid: mid,
platform: 'yqq',
hostUin: 0,
needNewCode: 0,
categoryId: 10000000,
pcachetime: +new Date()
};
return axios.get(url, {
params:param
}).then((res) => {
return Promise.resolve(res.data);
})
}
|
在想要获取刚刚得到数据的地方引入getLyrics
1
2
3
4
5
| import {getLyrics} from 'src/api/lyrics';
getLyrics(mid).then((res) => {
console.log(res);
});
|
上面这些就是axios的基本使用方法,更多详细信息可以移步这里